For
the next step of the modelling process of the crab pot, I was challenged with another huge hurdle (to say the least). This stage was where all the painstaking problems crawled in again. The rope.
I thought making some bendy cords would be simple enough, but believe me, it was anything but.
There aren't many tutorials, covering the whole modelling process to the end 'game ready' product, for rope. So, like previous obstacles I faced in the modelling stage, I used multiple methods and trial and error to find the best path.
Actually, creating a tube following a manually placed path, was the easiest part for me. I had picked this step up while at University. However, I had to manually place and move each Bezier path to form the guide lines, for yards of rope, in a natural and realistic way.
Hundreds of them.
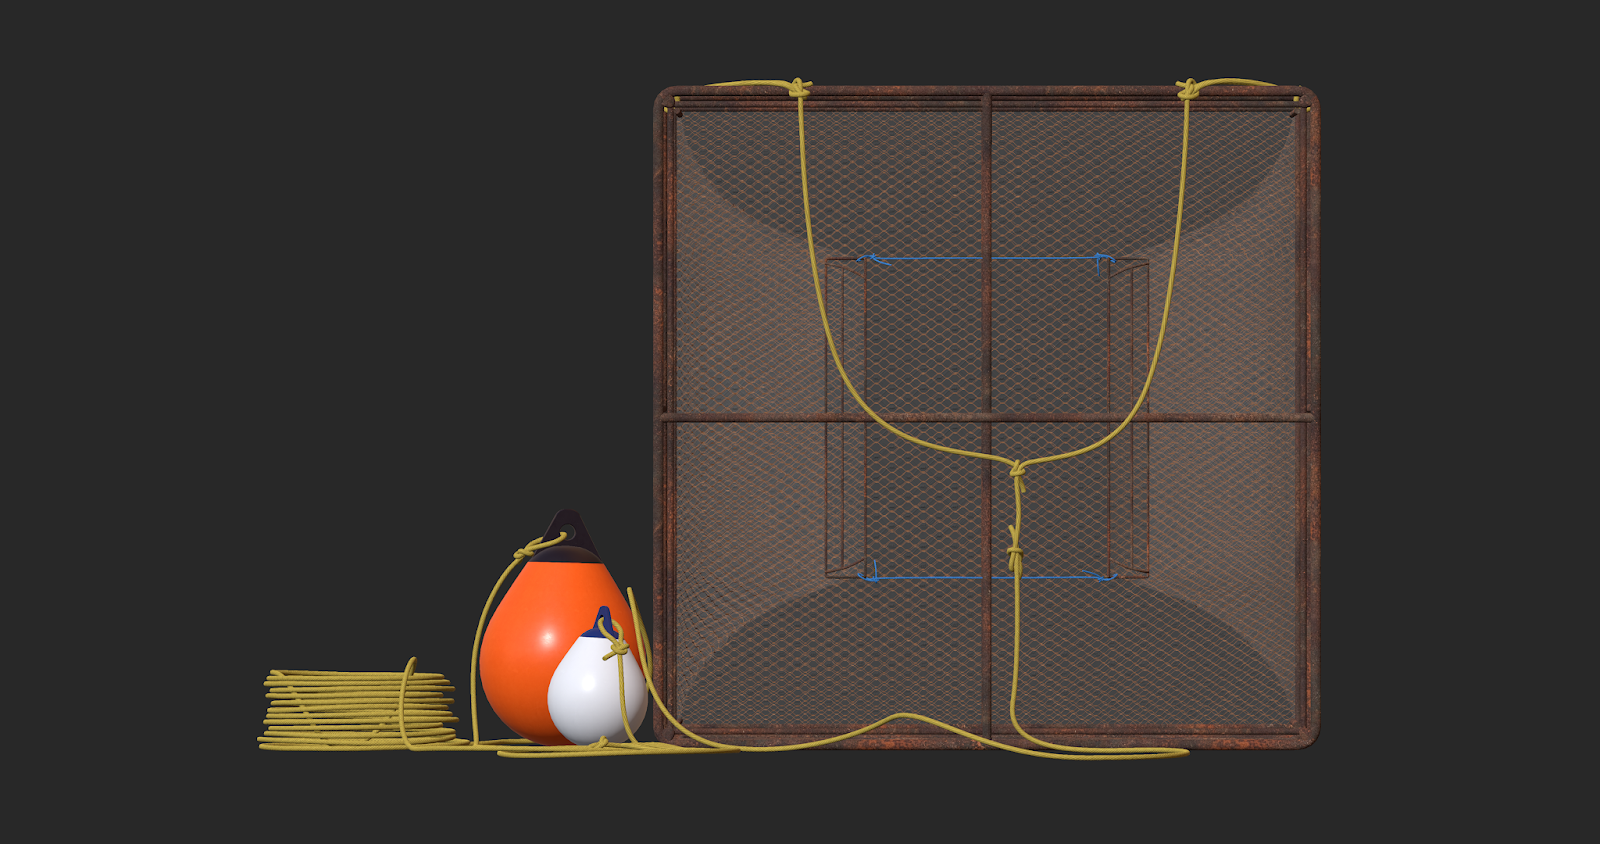
I spent more hours than I would have liked, setting up the paths to guide the rope along. I kept asking myself that there must be an easier way to tie knots or loop rope. And if I had found an easier way then I would have taken it. On the other hand, getting good at something, is something that takes time and effort.

Thankfully, if you don't delete the history of an object extruded from a path until the last stage, you can use this to your advantage. When tweaking the ropes position, such as in sections that come into contact with other objects and parts like knots and loops (see image above). It's as simple as highlighting the Bezier points (which are parented to the object) and adjusting like a puppeteer till it looks correct.

The last thing for the crab pot I had to model was the netting. Now, the front, top and bottom of the pot are simple flat planes, yet the sides are something else entirely. This is where all the hungry crabs shuffle through. As you can see here, I had to go through several variations to get the right curved funnel shape.

While UV unwrapping along the way for me has gotten much easier, since the boat door model I created (see here), it still comes with its tests. Such as below. Here, I had to split the UV shell into two halves first, and then use multiple UV tools to refine the complicated wrap around the shape of the net funnel.

After exporting the model, I downloaded some free seamless materials to speed up the last phase of texturing. Here we have the texture for the rope on my model in the software Substance Player. I was very happy seeing the displacement settings working correctly on my unwrapped rope in the 3D preview. Displacement creates the illusion of depth on the rendered faces of an object (see before and after below for difference).

Below, we have an orthographic render in the software Quixel (a plug-in with Photoshop); with all the materials allocated to the model parts. I had a lot of difficulty assigning the alpha for the netting and changing the channel to produce a cut-out effect. However, once resolved, the results were quite satisfying knowing too that, the method would help with processing when the model is in-game.
 Jason Bartlett ©
In the next post, I'll show some fancy renders of the model with displacement added for all that rope. As well as this, the model in my game engine of choice, Unity.
Thanks for reading and have a happy new year! :)
the next step of the modelling process of the crab pot, I was challenged with another huge hurdle (to say the least). This stage was where all the painstaking problems crawled in again. The rope.
I thought making some bendy cords would be simple enough, but believe me, it was anything but.
There aren't many tutorials, covering the whole modelling process to the end 'game ready' product, for rope. So, like previous obstacles I faced in the modelling stage, I used multiple methods and trial and error to find the best path.
Actually, creating a tube following a manually placed path, was the easiest part for me. I had picked this step up while at University. However, I had to manually place and move each Bezier path to form the guide lines, for yards of rope, in a natural and realistic way.
Hundreds of them.
I spent more hours than I would have liked, setting up the paths to guide the rope along. I kept asking myself that there must be an easier way to tie knots or loop rope. And if I had found an easier way then I would have taken it. On the other hand, getting good at something, is something that takes time and effort.

Thankfully, if you don't delete the history of an object extruded from a path until the last stage, you can use this to your advantage. When tweaking the ropes position, such as in sections that come into contact with other objects and parts like knots and loops (see image above). It's as simple as highlighting the Bezier points (which are parented to the object) and adjusting like a puppeteer till it looks correct.

The last thing for the crab pot I had to model was the netting. Now, the front, top and bottom of the pot are simple flat planes, yet the sides are something else entirely. This is where all the hungry crabs shuffle through. As you can see here, I had to go through several variations to get the right curved funnel shape.

While UV unwrapping along the way for me has gotten much easier, since the boat door model I created (see here), it still comes with its tests. Such as below. Here, I had to split the UV shell into two halves first, and then use multiple UV tools to refine the complicated wrap around the shape of the net funnel.

After exporting the model, I downloaded some free seamless materials to speed up the last phase of texturing. Here we have the texture for the rope on my model in the software Substance Player. I was very happy seeing the displacement settings working correctly on my unwrapped rope in the 3D preview. Displacement creates the illusion of depth on the rendered faces of an object (see before and after below for difference).

Below, we have an orthographic render in the software Quixel (a plug-in with Photoshop); with all the materials allocated to the model parts. I had a lot of difficulty assigning the alpha for the netting and changing the channel to produce a cut-out effect. However, once resolved, the results were quite satisfying knowing too that, the method would help with processing when the model is in-game.
In the next post, I'll show some fancy renders of the model with displacement added for all that rope. As well as this, the model in my game engine of choice, Unity.
Thanks for reading and have a happy new year! :)
Comments
Post a Comment